在上一教程中,我们完成了一个绘制三角函数圆的实例,对 AutoLisp 语言的应用有了一个初步的了解。在这一教程中,我们更深入地学习 AutoLisp 语言,并完成两个相对更有实用性的实例,分别是
- 读取
OpenSees 模型,并在 AutoCAD 中绘制节点和单元。
- 在
Model 空间中完成批量打印。
在这两个实例中,主要介绍以下几个函数。
-
entmake 函数,用于创建实体。
-
while 函数,用于构建循环。
-
open 函数和 close 函数,用于打开和关闭文件。
-
read-line 函数,用于读取文件。
-
assoc 函数,用于查找关联表。
下面让我们开始吧!
绘制 OpenSees 模型
脚本功能
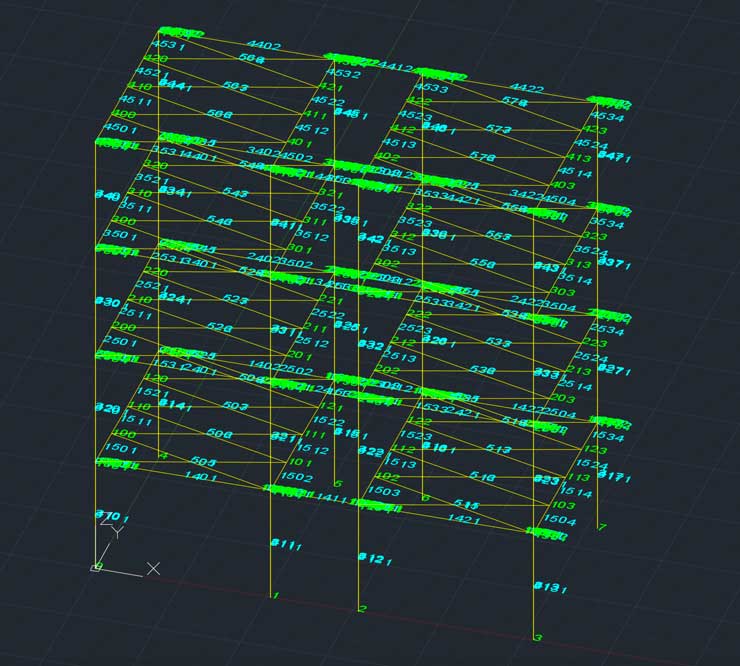
本实例可以读取 OpenSees 中所建立的模型,并在 AutoCAD 中绘制。主要的实现方法是在 OpenSees 模型执得的过程中,通过脚本输出一个文本文件,用 AutoLisp 读取这个文本文件,以获得结构模型的信息。
对于不使用 OpenSees 的用户,本文也详细介绍了所读取文本文件的格式,并不成为学习这个实例的障碍。如果您想了解 OpenSees ,请参考本网站的[OpenSees 入门教程][/2017/opensees-bootstrap/]。
在本实例中,主要介绍以下函数
-
entmake 函数,用于创建实体。
-
while 函数,用于构建循环。
-
open 函数和 close 函数,用于打开和关闭文件。
-
read-line 函数,用于读取文件。
-
assoc 函数,用于查找关联表。
脚本代码
1
2
3
4
5
6
7
8
9
10
11
12
13
14
15
16
17
18
19
20
21
22
23
24
25
26
27
28
29
30
31
32
33
34
35
36
37
38
39
40
41
42
43
44
45
46
47
48
49
50
51
52
53
54
55
56
57
58
59
60
61
62
63
64
| (defun c:plotOpensees(/ filename)
(entmake (list'(0 . "LAYER")'(100 . "AcDbSymbolTableRecord")'(100 . "AcDbLayerTableRecord") '(62 . 1) '(370 . 0) '(70 . 0) '(290 . 1) '(2 . "nodes")))
(entmake (list'(0 . "LAYER")'(100 . "AcDbSymbolTableRecord")'(100 . "AcDbLayerTableRecord") '(62 . 2) '(370 . 0) '(70 . 0) '(290 . 1) '(2 . "elements")))
(entmake (list'(0 . "LAYER")'(100 . "AcDbSymbolTableRecord")'(100 . "AcDbLayerTableRecord") '(62 . 3) '(370 . 0) '(70 . 0) '(290 . 1) '(2 . "nodeTag")))
(entmake (list'(0 . "LAYER")'(100 . "AcDbSymbolTableRecord")'(100 . "AcDbLayerTableRecord") '(62 . 4) '(370 . 0) '(70 . 0) '(290 . 1) '(2 . "eleTag")))
(setq filename (getfiled "select file" "/" "txt" 0))
(setq textsize (getint "text height<200>:"))
(if (= textsize nil) (setq textsize 200))
(setq f (open filename "r"))
(setq line (read-line f))
(setq line (read-line f))
(setq nodecoords ())
(while (= line "node") (progn
(setq line (read-line f))
(setq nodetag line)
(setq line (read-line f))
(setq xcoord (atof line))
(setq line (read-line f))
(setq ycoord (atof line))
(setq line (read-line f))
(setq zcoord (atof line))
(setq point (list xcoord ycoord zcoord))
(setq node (list nodetag point))
(setq nodecoords (cons node nodecoords))
(entmake (list '(0 . "POINT") '(8 . "nodes") (cons 10 point)))
(entmake (list '(0 . "TEXT") '(8 . "nodeTag") (cons 10 point) (cons 1 nodetag) (cons 40 textsize)))
(setq line (read-line f))
))
(setq line (read-line f))
(while (= line "ele") (progn
(setq line (read-line f))
(setq eletag line)
(setq line (read-line f))
(setq iNode line)
(setq line (read-line f))
(setq jNode line)
(setq iNodeCoord (cadr (assoc iNode nodecoords)))
(setq jNodeCoord (cadr (assoc jNode nodecoords)))
(entmake (list '(0 . "LINE") '(8 . "elements") (cons 10 iNodeCoord) (cons 11 jNodeCoord)))
(setq midx (/ (+ (car iNodeCoord) (car jNodeCoord)) 2))
(setq midy (/ (+ (cadr iNodeCoord) (cadr jNodeCoord)) 2))
(setq midz (/ (+ (caddr iNodeCoord) (caddr jNodeCoord)) 2))
(setq midpoint (list midx midy midz))
(entmake (list '(0 . "TEXT") '(8 . "eleTag") (cons 10 midpoint) (cons 1 eletag) (cons 40 textsize)))
(setq line (read-line f))
))
(close f)
)
|
以上脚本文件可以点击下载
使用方法
首先,要对 OpenSees 的模型作一个输出。这里采用一个 tcl 脚本对结构进行输出。脚本的代码如下
1
2
3
4
5
6
7
8
9
10
11
12
13
14
15
16
17
18
19
20
21
22
23
24
| set filename "opslog.txt"
set f [open $filename "w"]
puts $f nodes:
set nodetags [getNodeTags]
foreach nodetag $nodetags {
puts $f node
puts $f $nodetag
puts $f [nodeCoord $nodetag 1]
puts $f [nodeCoord $nodetag 2]
puts $f 0.0
}
puts $f elements:
set eletags [getEleTags]
foreach eletag $eletags {
puts $f ele
puts $f $eletag
set elenode [eleNodes $eletag]
puts $f [lindex $elenode 0]
puts $f [lindex $elenode 1]
}
puts $f print:
close $f
print $filename
puts "model printed to opslog.txt"
|
将以上代码(点击下载)保存在 opslog.tcl 文件中,并与想输出的 OpenSees 脚本放在同一目录下,在 OpenSees 脚本的最后增加一句
再执行,会发现生成了一个文件 opslog.txt 。打开,内容结构如下
1
2
3
4
5
6
7
8
9
10
11
12
13
14
15
16
17
18
19
20
21
22
23
24
25
26
| nodes:
node
1 (节点编号)
0.0000000000 (1节点1轴坐标)
0.0000000000 (1节点2轴坐标)
0.0000000000 (1节点3轴坐标)
node
2
0.0000000000
0.0000000000
1000.0000000000
node
...
elements:
ele
1 (单元编号)
1 (i节点编号)
2 (j节点编号)
ele
2
2
3
ele
...
print:
... (系统的输出)
|
如果您不使用 OpenSees ,可以按以上格式准备一个 txt 文件,以完成以下的步骤。
打开 AutoCAD ,加载上述脚本,并在控制台中输出
执行,选择生成的文件,即可完成。
执行效果
代码解读
entmake 函数
这个函数用于在 AutoCAD 中创建实体。该函数应用范围十分广泛。与教程上篇不同,这里没有采用 command 函数来创建实体,而是采用 entmake 函数,可以真接操作更底层的模型,执行更加快速。
使用方法为
实体数据表: 一个特殊的表,保存了一系列实体的数据,每一项数据用一个点对表示。点对的左项是一个整数,每一个整数对应了一种信息。右项是这个信息的值。
下面简要列出一些常用的实体数据信息
| 编号 |
对应信息 |
| 0 |
实体类型 |
| 2 |
块名 |
| 6 |
线型名 |
| 8 |
图层名 |
| 10 |
关键点坐标 |
实体数据信息还有很多,用户可以自行查看文档。
while 函数
这个函数用于构造一个循环体,与其它纺程语言中的 while 十分相似。使用方法为
如果循环体中有多个语句,则需要用 progn 函数把这些语句包裹起来,用法为
和 C 语言中的大括号用法相同。这里不再赘述。
open 函数和 close 函数
open 函数用于打开文件,相对应地, close 函数用于关闭文件。用法为
1
2
| (setq [文件句柄] (open [文件名] [打开方式])
(close [文件句柄])
|
文件句柄: 是一个变量,用于操作所打开的文件。
文件名: 打开的文件名,应用绝对路径。
打开方式: 打开文件的方式,有只读 "r" ,写 "w" ,附加 "a" 等。
打开文件后,应养成关闭的良好习惯。
read-line 函数
打开文件后,为了读取文件,我们通常使用 read-line 函数。用法为
1
| (setq [变量名] (read-line [文件句柄]))
|
即可把当前读到的文本文件的一行读出来,保存在变量中。
通常, read-line 函数与 while 函数配合使用。请读者参照本例的用法。
assoc 函数
这一函数用于从关联表中查找内容。在本例的第 51、52 行中有用到。使用方法为
关联表: 是一个由表组成的表,上面所提到的 实体数据表 就是一种关联表。也可以由用户构建关联表。本例中的关联表就是由用户构建的。
查找内容: assoc 函数会在关联表中的每一个子表中,查找第一个元素,如果这个元素与查找内容相同,则将这个子表返回。
在本例中,用这个函数完成对点坐标的查找。这是由于每个点的编号是不重复的。如果子表中出现重复的第一元素,则只返回第一个出现的子表。这一点要特别注意。