前面两篇文章分别介绍了 Navbar 的后端和前端的制作过程。本文在现有的创建章节基础上,添加创建进度游标和进度条功能。
进度游标是一个图形,它可以示意当前 PPT 展示的进度信息。它可以分为按章节进度和按页面进度两种。按章节进度即每切换一章跳动一次,跟随着 Navbar 中的 section title 移动。而按页面即每翻一页前进一次。
游标在每个页面中只显示当前的位置。如果把对应所有页的游标都放在同一页面中,并对当前页、过去页、未来页使用不同的样式,就变成了进度条。
下面我们来创建这些元素。
创建游标
创建进度游标时,在每一页要有一个图形作为游标。下面我们来定义一个进度游标的样式。进度游标可以有两种选择:GeometricShape 和 Image 。尽管 Office.js 提供了插入 SVG 图片的功能,但是由于游标通常比较小,使用 SVG 的意义不大,就暂不提供这一功能了。下面我们在第一页 PPT 中分别来创建这两种图形。
GeometricShape 类型识别
GeometricShape 就是 PowerPoint 中自带的一些基本图形。目前的 PowerPoint 库中支持多数基本图形的创建,但是不支持黄色控件的编辑以及旋转。在创建时,有一个 GeometricShape 的枚举类型用于指定图形的形状。但是在读取属性的时候,这一枚举类型无法被读取。这就导致我们想在页面中先创建一个几何图形再来 match 它的 GeometricShape 信息变得困难。因此我们使用了一个 trick ,就是从 PowerPoint 对图形的自动命名中找到不同几何图形名称与图形类别的关系,从而推断出图形的类别。
前面提到,为了调试方便,我们创建了一个 Log 按钮,并绑定了一个 log() 方法。这里我们利用它来临时读取几何图形的信息,并打印在控制台中。
1
2
3
4
5
6
7
| {
methods: {
load() {
tryCatch(logShapeName);
}
}
}
|
1
2
3
4
5
6
7
8
| async function logShapeName() {
await PowerPoint.run(async context => {
const shapes = context.presentation.getSelectedShapes();
shapes.load("items/name");
await context.sync();
console.log(shapes.map(shape => shape.name));
})
}
|
这个函数我们作为测试使用,写得比较简单。这样我们绘制一个图形,再点击 Log 按钮,就可以看到它的 name 属性打印在控制台中了。如图所示:
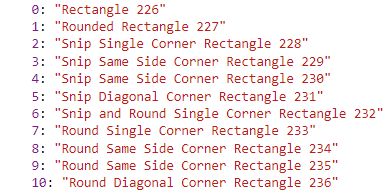
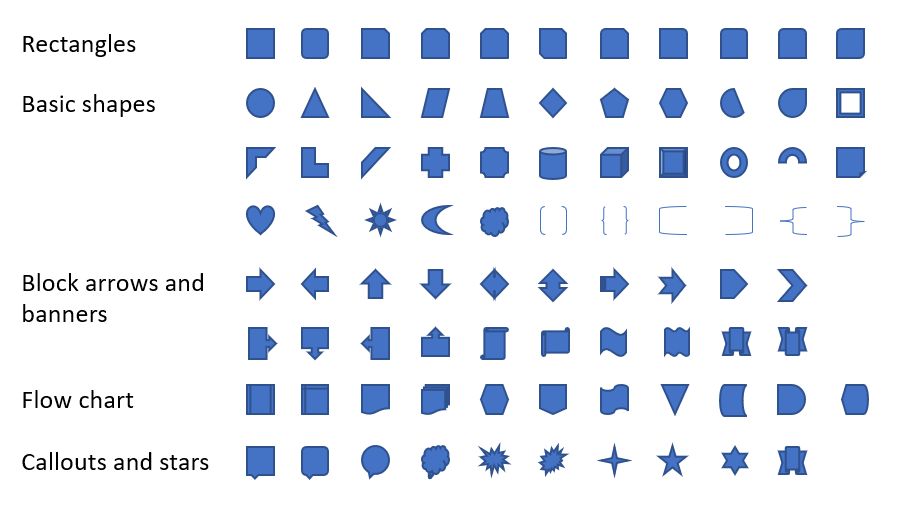
可以看出,命名的方式就是 shape 的类别加上一个数字。这样我们只需要使用正则表达式把 shape 的类别读出来,再映射到 GeometricShape 的枚举类型中,就可以了。这里我列举了一些可能被用作游标的 shape 类别,如下图所示。
然后写一个读取 name ,得到 GeometricShape 的函数:
1
2
3
4
5
6
7
8
9
10
11
12
13
14
15
16
17
18
19
20
21
22
23
24
25
26
27
28
29
30
31
32
33
34
35
36
37
38
39
40
41
42
43
44
45
46
47
48
49
50
51
52
53
54
55
56
57
58
59
60
61
62
63
64
65
66
| function getGeomShapeType(name) {
const mapper = {
"Rectangle":1,
"RoundedRectangle":1,
"SnipSingleCornerRectangle": 1,
"SnipSameSideCornerRectangle": 1,
"SnipDiagonalCornerReectangle": 1,
"SnipandRoundSingleCornerRectangle": 1,
"RoundSingleCornerRectangle": 1,
"RoundSameSideCornerRectangle": 1,
"RoundDiagnalCornerRectangle": 1,
"Oval": 1,
"IsoscelesTriangle":1,
"Parallelogram":1,
"Trapezoid": 1,
"Diamond": 1,
"RegularPentagon": 1,
"Hexagon": 1,
"Chord": 1,
"Teardrop": 1,
"Frame": 1,
"HalfFrame": 1,
"L-Shape": 1,
"DiagonalStripe": 1,
"Cross": 1,
"Plaque": 1,
"Can": 1,
"Cube": 1,
"Bevel": 1,
"Donut": 1,
"BlockArc": 1,
"FoldedCorner": 1,
"Heart": 1,
"LightningBolt": 1,
"Sun": 1,
"Moon": 1,
"Cloud": 1,
"DoubleBracket": 1,
"DoubleBrace": 1,
"LeftBracket": 1,
"RightBracket": 1,
"LeftBrace": 1,
"RightBrace": 1,
"RightArrow": 1,
"LeftArrow": 1,
"UpArrow": 1,
"DownArrow": 1,
"Left-RightArrow": 1,
"Up-DownArrow": 1,
"StripedRightArrow": 1,
"NotchedRightArrow": 1,
"Pentagon": 1,
"Chevron": 1,
"RightArrowCallout": 1,
"DownArrowCallout": 1,
"LeftArrowCallout": 1,
"UpArrowCallout": 1,
"Flowchart:PredefinedProcess": 1,
};
let key = name.replace(/\d+$/g, "").replace(" ", "")
if (key in mapper) {
return mapper[key];
} else {
return "";
}
}
|
以上代码中,首先创建了一个对象 mapper ,用于将形状名映射到 PowerPoint 的枚举类型名。然后使用正则表达式去掉形状名中的数字和空格,就可以得到形状对应的 GeometricShape 类别了。
Shape 属性匹配
在前文匹配文本框的格式时,我们读取了要匹配对象的 width height text 参数,但是在 setTextboxFormat() 中没有设置这些参数。这是因为对于文本框,它的长度和高度需要通过计算获取。而对于游标,它的 width height 是不变的,如果有文字 text 也是不变的。所以需要将这些属性也写到对新对象的操作中。这里我们写一个新的函数:
1
2
3
4
5
6
| function setShapeFormat(shape, format) {
shape.width = format.width;
shape.height = format.height;
shape.textFrame.textRange.text = format.textFrame.textRange.text;
setTextboxFormat(shape, format);
}
|
这要,就把其他所需的参数都设置进去了。
图片插入
尽管 PowerPoint API 没有提供图片的导入功能,但是 Office 通用的 API 提供了相应的功能。在 Script Lab 的 Samples 中可以找到插入位图以及 svg 矢量图的方法。这里的图片是使用 base64 编码读取过来,然后插入到 Office 软件中的。遗憾的是没有找到从 PowerPoint 中直接以 base64 的方式直接读取图片的方法。因此这里只能选择从文件中读取。先写一个函数用于插入图片:
1
2
3
4
5
6
7
8
9
10
11
12
13
14
15
16
17
| async function insertImage(shapes, cursorConfig): {
await Office.context.document.setSelectedDataAsync(
cursorConfig.data,
{
coercionType: Office.CoercionType.Image,
imageLeft: 0,
imageTop: 0,
imageWidth: cursorConfig.width,
imageHeight: cursorConfig.height,
},
function(asyncResult) {
if (asyncResult.status === Office.AsyncResultStatus.Failed) {
console.log(asyncResult.error.message);
}
}
);
}
|
其中 cursorConfig 的 data 属性保存的是一个以 Base64 编码的字符串,代表一个位图图片。这个图片可以经前端设置由用户选取。两个属性 imageWidth 和 imageHeight 如果指定,则图片会被压缩。如果不指定,图片会以原始大小放置。
位置计算
在位置计算时,我们分为两种游标来设置。第一种是根据章节来移动的游标,每变化一个章节移动一次。第二种是根据页面来移动的游标,每翻一页都移动一次,类似于一个进度条。下面我们对这两种游标分别进行位置计算。
按章节移动
在实现 sectionBar 的过程中,我们使用 computeSectionBarProp() 计算了每一个章节文本框的位置信息。这里可以利用这个位置信息来设置每个游标的位置。但是需要游标相对于章节文本框有一定的偏移。而且每一个文本框的大小不同,在对齐时,是与起始位置对齐,还是与终止位置对齐,还是居中,也是需要设置的要素。因此,把定义游标的数据结构设置为:
1
2
3
4
5
6
7
8
9
10
11
12
13
14
15
16
17
| function defaultCursorFormat() {
}
function defaultCursorConfig() {
return {
by: "Slide",
kind: "Shape",
data: "Rectangle",
width: 10,
height: 10,
topOffset: 5,
leftOffset: 5,
alignment: "Start",
format: defaultCursorFormat(),
}
}
|
下面来根据 sectionBarConfig 和 sectionCursorConfig 来计算游标的位置。
1
2
3
4
5
6
7
8
9
10
11
12
13
14
15
16
17
18
19
20
21
22
23
24
25
26
27
28
29
30
31
32
33
| async function computeCursorPropBySection(cursorConfig, sectionBarConfig) {
const { direction, slideSectionIds, sectionTitles } = sectionBarConfig;
const barProp = await computeSectionBarProp(sectionBarConfig);
const { alignment: align, format, leftOffset, topOffset, width, height } = cursorConfig;
let secProp;
if (direction === "Vertical") {
secProp = barProp.map((p) => {
const realHeight = height <= 0 ? p.height + height : height;
const alignOffset =
align === "Center" ? (p.height - realHeight) / 2 : align === "End" ? p.height - realHeight : 0;
return {
width: width,
height: realHeight,
top: p.top + topOffset + alignOffset,
left: p.left + leftOffset
};
});
} else if (direction === "Horizontal") {
secProp = barProp.map((p) => {
const realWidth = width <= 0 ? p.width + width : width;
const alignOffset = align === "Center" ? (p.width - realWidth) / 2 : align === "End" ? p.width - realWidth : 0;
return {
width: realWidth,
height: height,
top: p.top + topOffset,
left: p.left + leftOffset + alignOffset
};
});
} else {
throw new Error(`Invalid direction ${direction} in computeCursorPropBySection()`)
}
return slideSectionIds.map((i, n) => secProp[i]);
}
|
这里要注意的是, sectionBarConfig 的数据模型在上一篇文章中重构了一下,现在的数据模型为:
1
2
3
4
5
6
7
8
9
10
11
12
13
| function defaultSectionBarConfig() {
return {
direction: "Horizontal",
distribution: "EqualSpacing",
rangeWidth: 960,
rangeHeight: 30,
rangeLeft: 0,
rangeTop: 0,
activeFormat: defaultActiveFormat(),
inactiveFormat: defaultInactiveFormat(),
showActiveOnly: false
}
}
|
因此在上面的代码中读取的是 sectionBarConfig 的 direction 属性了。
按页面移动
按页面移动的游标与按章节移动的类似,只不过数量上要多一些:
1
2
3
4
5
6
7
8
9
10
11
12
13
14
15
16
17
18
19
20
21
22
23
24
25
26
27
28
29
30
31
32
33
34
35
36
| function computeCursorPropBySlide(cursorConfig, sectionBarConfig) {
const { slideSectionIds, direction, rangeWidth, rangeHeight, rangeLeft, rangeTop } = sectionBarConfig;
const { alignment: align, width, height } = cursorConfig;
const slideCount = slideSectionIds.length;
if (direction === "Vertical") {
const span = rangeHeight / slideCount;
return Array(slideCount)
.fill(0)
.map((_, i) => {
const realHeight = height <= 0 ? span + height : height;
const alignOffset = align === "Center" ? (span - realHeight) / 2 : align === "End" ? span - realHeight : 0;
return {
width: width,
height: realHeight,
left: rangeLeft,
top: rangeTop + span * i + alignOffset
};
});
} else if (direction === "Horizontal") {
const span = rangeWidth / slideCount;
return Array(slideCount)
.fill(0)
.map((_, i) => {
const realWidth = width <= 0 ? span + width : width;
const alignOffset = align === "Center" ? (span - realWidth) / 2 : align === "End" ? span - realWidth : 0;
return {
width: realWidth,
height: height,
left: rangeLeft + span * i + alignOffset,
top: rangeTop
};
});
} else {
throw new Error (`Invalid direction ${direction} in computeCursorPropBySlide()`)
}
}
|
这里设置了一个小的 trick 。以水平的进度条为例,如果把数值设置成0,通过计算使图形布满。如果设成负值,则将图形的长度设为相邻两个之间空隙的长度。
放置游标
以上完成了设置,我们就可以放置游标了。先写后端函数:
1
2
3
4
5
6
7
8
9
| async function computeCursorProp(cursorConfig, sectionBarConfig) {
if (cursorConfig.by === "Slide") {
return await computeCursorPropBySlide(cursorConfig, sectionBarConfig);
} else if (cursorConfig.by === "Section") {
return await computeCursorPropBySection(cursorConfig, sectionBarConfig);
} else {
throw new Error(`Invalid cursorConfig.by ${cursorConfig.by} in computeCursorProp()`)
}
}
|
上面的工厂计算了游标的 Prop ,下面根据计算的结果放置游标。首先是放置 GeometricShape :
1
2
3
4
5
6
7
8
9
10
11
12
13
14
15
16
17
| async function createShapeCursor(cursorConfig, sectionBarConfig) {
await PowerPoint.run(async (context) => {
const { slideSectionIds, slideSkipped } = sectionBarConfig;
const prop = await computeCursorProp(cursorConfig, sectionBarConfig);
console.log(prop);
prop.map((p, n) => {
if (slideSkipped[n]) {
return
}
const shapes = context.presentation.slides.getItemAt(n).shapes;
const shape = shapes.addGeometricShape(cursorConfig.shape, p);
setTextboxFormat(shape, cursorConfig.format);
shape.name = `NavbarCursor-${n}`;
});
await context.sync();
});
}
|
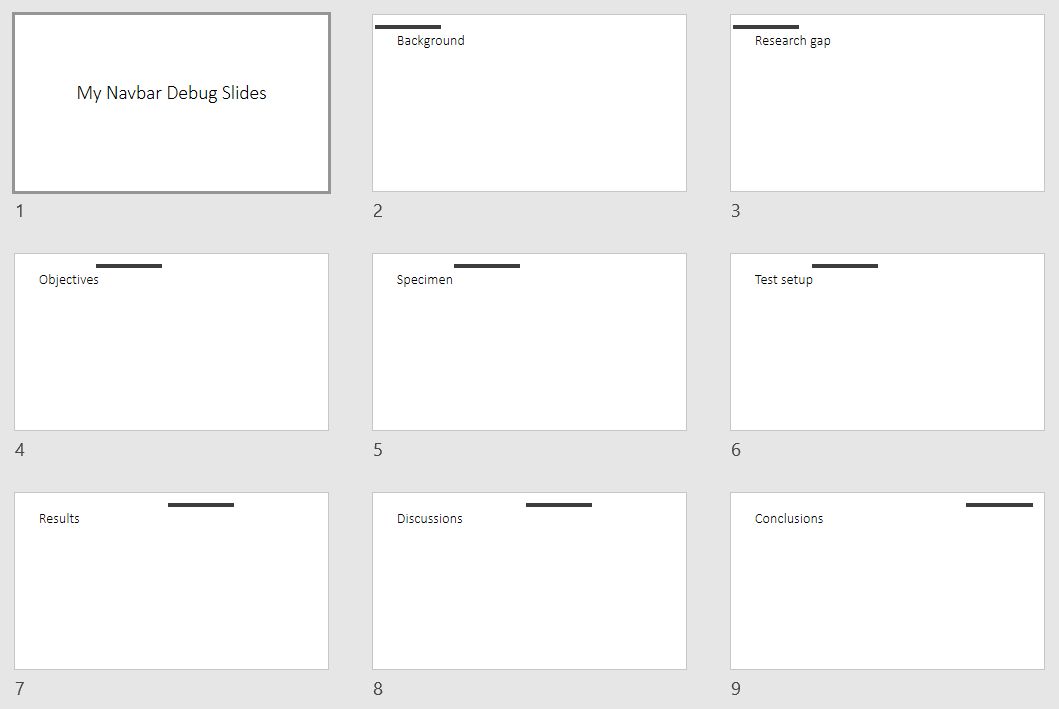
将这一函数加载到 Log 按钮中,点击就会发现成功创建了游标。如下图所示:
然后是放置图片:
设计前端页面
下面我们来设计前端页面,把 Cursor 需要的配置参数输入进来。
首先是数据模型,我们在 Vue 的 data 中创建一个新的对象:
1
2
3
4
5
6
7
8
9
10
11
12
13
14
15
| {
data() {
return {
cursor: {
shape: "Rectangle",
width: 0,
height: 5,
leftOffset: 5,
topOffset: 5,
alignment: "Start",
format: defaultCursorFormat(),
}
}
}
}
|
然后在前端界面中再加入这些属性的输入框:
1
2
3
4
5
6
7
8
9
10
11
12
13
14
15
16
17
18
19
20
21
22
23
24
25
26
27
28
29
30
31
32
33
34
35
36
37
38
39
40
41
42
43
44
45
46
47
48
| <div class="row">
<div class="col s12">
<h6>Define cursor</h6>
</div>
</div>
<div class="row">
<div class="input-field col s6">
<select v-model="cursor.shape">
<option value="Rectangle">Rectangle</option>
<option value="Circle">Circle</option>
</select>
<label>Shape</label>
</div>
<div class="input-field col s6">
<select v-model="cursor.alignment">
<option>Start</option>
<option>Center</option>
<option>End</option>
</select>
<label>Alignment</label>
</div>
</div>
<div class="row">
<div class="input-field col s3">
<input id="cursorLeftOffset" type="text" class="validate" v-model.number="cursor.leftOffset">
<label for="cursorLeftOffset">Left offset</label>
</div>
<div class="input-field col s3">
<input id="cursorTopOffset" type="text" class="validate" v-model.number="cursor.topOffset">
<label for="cursorTopOffset">Top offset</label>
</div>
<div class="input-field col s3">
<input id="cursorWidth" type="text" class="validate" v-model.number="cursor.width">
<label for="cursorWidth">Width</label>
</div>
<div class="input-field col s3">
<input id="cursorHeight" type="text" class="validate" v-model.number="cursor.height">
<label for="cursorHeight">Height</label>
</div>
</div>
<div class="row">
<div class="input-field col s2">
<label>Match format:</label>
</div>
<div class="input-field col s10">
<a class="waves-effect waves-light btn-flat" data-position="top" data-tooltip="Select a textbox first" @click="matchSelectedShapeFormat()">Cursor</a>
</div>
</div>
|
定义后的界面如下图所示:

然后绑定匹配目标格式的方法:
1
2
3
4
5
6
7
8
9
10
11
12
| {
methods: {
matchSelectedShapeFormat() {
readSelectedShapeFormat().then(format => {
this.cursor.shape = getGeomShapeType(format.name);
this.cursor.width = format.width;
this.cursor.height = format.height;
this.cursor.format = format;
})
}
}
}
|
这个 cursor 可以直接传入后端的 createCursor() 函数,所以不需要再使用 computed 属性来组装了。这时,把 createCursor() 函数与 Log 按钮绑定,点击后就可以看到页面中生成游标了,如图所示。
创建进度条
有时我们不仅仅希望页面有一个游标,还希望能有一个进度条,更清晰地展示当前页面所处的位置。如 LaTeX beamer 的 Frankfurt 主题就可以实现这一功能,如下图所示:

下面我们就在游标的逻辑上进行小的修改,从而实现进度条功能。
每页创建所有游标
前面的游标每一页只有一个。在创建按页的进度条时,我们只需要在每一页中都创建所有游标,再区别当前页、已完成页、未完成页的格式,就可以了。而在创建按章节的进度条时,同章节的游标会重合。这时我们就需要设置一个偏移量,使不同页面的游标错开,这样就可以在同一页中都显示了。下面我们来创建 computeProgressBarPropBySection() 函数,并定义了输入它的参数 progressBarConfig 的数据模型。其中有一个参数 offset ,表示同章节相邻两个游标之间的距离。
1
2
3
4
5
6
7
8
9
10
11
12
13
14
15
16
17
18
19
20
21
22
23
24
25
26
| function defaultProgressBarConfig() {
return {
bySlide: true,
offset: 20,
currentCursor: defaultCursorConfig(),
backCursor: defaultCursorConfig(),
foreCursor: defaultCursorConfig(),
}
}
function computeProgressBarProp(progressBarConfig, sectionBarConfig) {
const sectionBarProp = computeSectionBarProp(sectionBarConfig);
const {currentCursor, backCursor, foreCursor, offset} = progressBarConfig;
const currentProp = await computeCursorProp(currentCursor);
const backProp = await computeCursorProp(backCursor);
const foreProp = await computeCursorProp(foreCursor);
return {sectionBarProp, currentProp, backProp, foreProp}
}
function createProgressBar(progressBarConfig, sectionBarConfig) {
const { sectionBarProp, currentProp, backProp, foreProp } = computeProgressBarProp(progressBarConfig, sectionBarConfig);
const { slideSectionIds } = sectionBarProp;
slideSectionIds.map((_, n) => {
})
}
|
1
2
3
4
5
6
7
8
9
10
11
12
13
14
15
16
17
18
19
20
21
22
| async function createCursor(cursorConfig, sectionBarConfig) {
await PowerPoint.run(async context => {
if (cursorConfig.bySlide) {
const prop = await computeCursorPropBySlide(cursorConfig, sectionBarConfig);
prop.map((p, n) => {
const shapes = context.presentation.slides.getItemAt(n).shapes;
const shape = shapes.addGeometricShape(cursorConfig.shape, p);
setTextboxFormat(shape, cursorConfig.format);
shape.name = `NavbarCursor-${n}`;
})
} else {
const prop = await computeCursorPropBySection(cursorConfig, sectionBarConfig);
prop.map((p, n) => {
const shapes = context.presentation.slides.getItemAt(n).shapes;
const shape = shapes.addGeometricShape(cursorConfig.shape, p);
setTextboxFormat(shape, cursorConfig.format);
shape.name = `NavbarCursor-${n}`;
})
}
await context.sync();
})
}
|
1
2
3
4
5
6
7
8
9
10
11
12
13
14
15
16
17
18
19
20
21
22
23
24
25
26
27
28
29
30
31
32
33
34
35
36
37
38
39
40
41
42
43
44
45
46
47
48
49
50
51
52
53
54
55
56
57
58
59
60
61
62
63
64
65
66
67
| async function computeProgressBarDiscreteGroupedProp(progressBarConfig, sectionBarConfig) {
const { slideSectionIds } = sectionBarConfig;
const {
docking,
slideCount,
startOffset,
endOffset,
edgeOffset,
width,
backColor,
foreColor,
discrete
} = progressBarConfig;
const { group, currentColor, length } = discrete;
const { spacing } = group;
const sectionBarProp = await computeSectionBarProp(sectionBarConfig);
const step = length + spacing;
if (docking === "Left" || docking === "Right") {
const left = docking === "Left" ? edgeOffset : SLIDEWIDTH - edgeOffset - width;
const step = length + spacing;
let currentSectionSlideCount = 0;
let oldId = -1;
const tops = slideSectionIds.map((id, n) => {
if (id !== oldId) {
currentSectionSlideCount = 0;
oldId = id;
}
currentSectionSlideCount += 1;
sectionBarProp[id].top + step * (currentSectionSlideCount - 1);
});
return Array(slideCount)
.fill(0)
.map((_, i) => {
return {
left: left,
top: tops[i],
width: length,
height: width
};
});
} else if (docking === "Top" || docking === "Bottom") {
const top = docking === "Top" ? edgeOffset : SLIDEHEIGHT - edgeOffset - width;
const step = length + spacing;
let currentSectionSlideCount = 0;
let oldId = -1;
const lefts = slideSectionIds.map((id, n) => {
if (id !== oldId) {
currentSectionSlideCount = 0;
oldId = id;
}
currentSectionSlideCount += 1;
sectionBarProp[id].left + step * (currentSectionSlideCount - 1);
});
return Array(slideCount)
.fill(0)
.map((_, i) => {
return {
left: lefts[i],
top: top,
width: length,
height: width
};
});
} else {
throw new Error(`Invalid docking ${docking}`);
}
}
|